인터페이스 구현체로 바꾸는 날 — NestJS DI와 TypeScript의 간극
📚 NestJS + Refine 풀스택 트러블슈팅 시리즈 (63편)
NestJS에서 TypeScript interface를 DI 토큰으로 쓸 수 없는 이유와, 인터페이스 의존을 구현체 의존으로 전환한 커밋 하나의 기록. 이론적 DDD와 프레임워크 현실 사이의 실용적 타협.
💡 Tip. 바쁜 현대인들을 위한 본문 요약
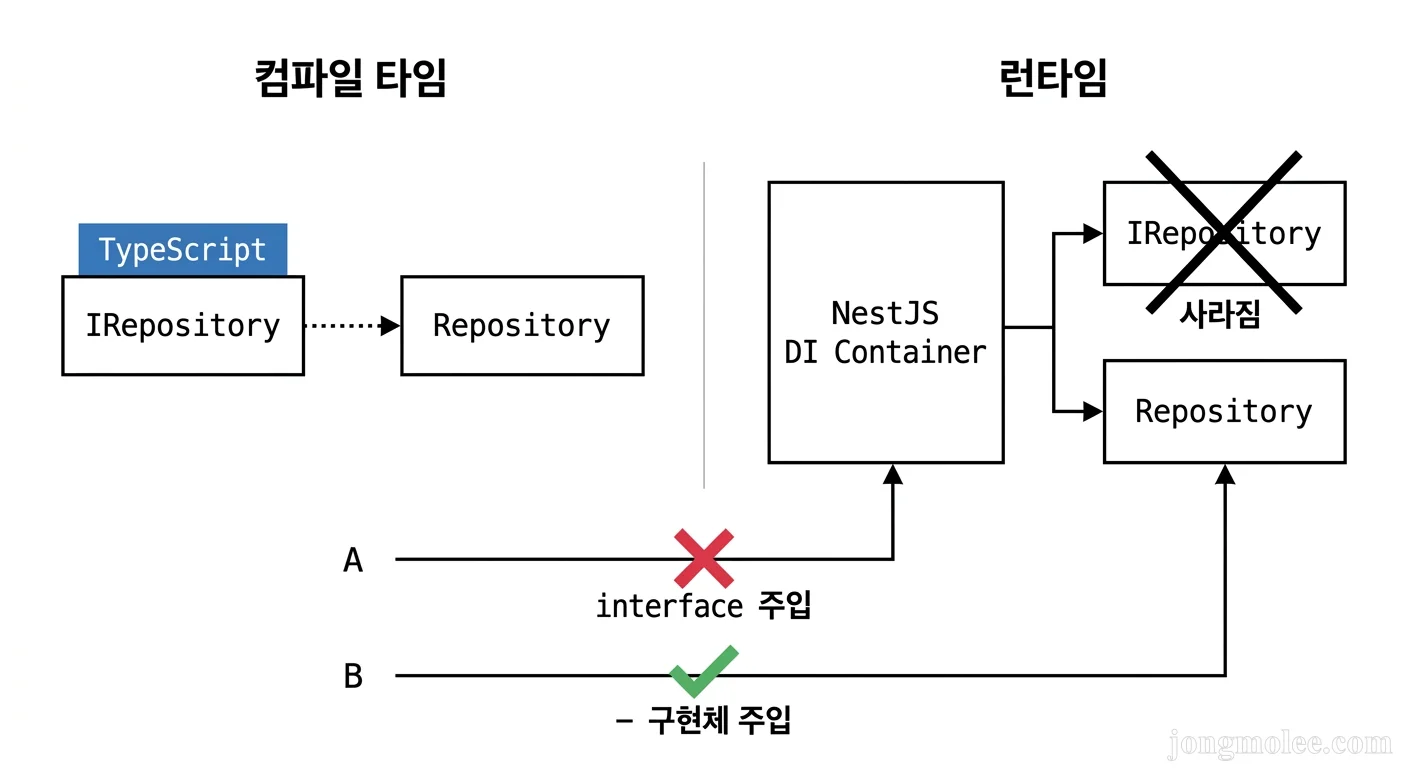
- TypeScript interface는 런타임에 사라진다. JavaScript로 컴파일되면 interface 정보가 남지 않아서 NestJS DI 컨테이너가 주입 대상을 찾을 수 없다
- NestJS DI는 클래스(생성자 함수) 기반이다.
reflect-metadata로 constructor 파라미터 타입을 읽는데, interface는 메타데이터로 남지 않는다- 선택지 3가지: Custom Provider(
@Inject토큰), Abstract Class, 구현체 직접 주입. 프로젝트 규모와 팀 상황에 따라 선택이 달라진다- 우리의 선택: 구현체 직접 주입. 1인 개발에서 커스텀 토큰은 보일러플레이트만 늘리고, 추상 클래스는 Prisma 모델과 궁합이 안 맞았다
- 인터페이스 파일은 남겨둔다. 계약(contract) 문서 + 테스트 Mock 타입으로서의 가치는 여전하다. 런타임 DI에서만 구현체를 쓸 뿐
🤔 발단 — 이론대로 했는데 안 된다
지난 편에서 DDD 3계층 아키텍처를 구축했다. Repository 인터페이스를 정의하고, Domain Service는 인터페이스에만 의존하게 만들었다. 교과서적으로 완벽한 구조였다.
// ❌ Before — 커밋 #19까지의 BlockGenerationService
import type { IContentItemRepository } from '../content/content-item.repository.interface';
import type { ILevelRepository } from '../level/level.repository.interface';

@Injectable()
export class BlockGenerationService {
  constructor(
    private readonly contentItemRepository: IContentItemRepository,
    private readonly levelRepository: ILevelRepository,
  ) {}
  // ...
}
보기에는 깔끔하다. Domain Service가 구현체를 모르니까 느슨한 결합이 완성된 것 같다. 그런데 서버를 켜는 순간, 현실이 찾아왔다.
$ pnpm start:dev

[Nest] ERROR  Nest can't resolve dependencies of the BlockGenerationService (?, ?).
Please make sure that the argument at index [0] is available in the AssignmentModule context.
두 개의 물음표. NestJS가 BlockGenerationService의 생성자 파라미터 두 개를 전혀 인식하지 못하고 있었다.
🔍 단서: 에러 메시지의
?가 핵심이다. NestJS가 타입 자체를 읽지 못할 때?가 나온다. 타입은 알지만 provider를 못 찾을 때는 클래스명이 표시된다.?는 “너 누군데?”라는 뜻이고, 클래스명은 “너 알겠는데 어디 있어?”라는 뜻이다.
🔬 원인 — TypeScript interface는 런타임에 존재하지 않는다
이 문제의 근본 원인은 TypeScript의 타입 소거(type erasure) 에 있다.
TypeScript를 JavaScript로 컴파일하면, interface와 type은 완전히 사라진다. JavaScript에는 인터페이스 개념이 없으니까. 컴파일 전후를 비교해보면 명확하다.
// TypeScript (컴파일 전)
import type { IContentItemRepository } from '../content/content-item.repository.interface';

constructor(
  private readonly contentItemRepository: IContentItemRepository,
) {}
// JavaScript (컴파일 후)
constructor(contentItemRepository) {}IContentItemRepository라는 타입 정보가 통째로 날아갔다. NestJS의 DI 컨테이너는 reflect-metadata 라이브러리를 통해 생성자 파라미터의 런타임 타입 메타데이터를 읽는다. 그런데 interface는 메타데이터로 남지 않으니, NestJS 입장에서는 “이 파라미터에 뭘 넣어줘야 하는지 모르겠다”가 되는 것이다.
반면 class는 다르다. class는 JavaScript로 컴파일해도 생성자 함수로 남는다.
// TypeScript
import { ContentItemRepository } from '../content/content-item.repository';

constructor(
  private readonly contentItemRepository: ContentItemRepository,
) {}
// JavaScript — class는 살아남는다
var ContentItemRepository = require('../content/content-item.repository').ContentItemRepository;
// reflect-metadata가 이 참조를 읽을 수 있다NestJS가 @Injectable() 데코레이터가 붙은 클래스를 발견하면, Reflect.getMetadata('design:paramtypes', BlockGenerationService)를 호출해서 생성자 파라미터 타입 목록을 가져온다. class면 [ContentItemRepository, LevelRepository] 같은 배열이 반환되지만, interface면 [Object, Object] 또는 아예 undefined가 나온다.
📌 핵심: 이건 NestJS의 한계가 아니라 TypeScript + JavaScript 생태계의 구조적 제약이다. Java나 C#처럼 런타임에 인터페이스 정보가 남는 언어에서는 이 문제가 없다. TypeScript의 타입 시스템은 컴파일 타임 전용이라는 걸 항상 기억해야 한다.
🛠️ 선택지 — 3가지 방법과 트레이드오프
NestJS 공식 문서에서도 이 문제를 다루고 있다. 해법은 크게 세 가지다.
방법 1: Custom Provider + @Inject 토큰
// 상수 토큰 정의
export const CONTENT_ITEM_REPOSITORY = 'CONTENT_ITEM_REPOSITORY';

// 모듈에서 매핑
@Module({
  providers: [
    {
      provide: CONTENT_ITEM_REPOSITORY,
      useClass: ContentItemRepository,
    },
  ],
})
export class AssignmentModule {}

// 서비스에서 주입
constructor(
  @Inject(CONTENT_ITEM_REPOSITORY)
  private readonly contentItemRepository: IContentItemRepository,
) {}장점: 완벽한 DIP(의존 역전). 구현체 교체가 모듈 설정 한 줄로 끝난다.
단점: 토큰 상수 파일 관리, @Inject() 데코레이터 필수, 보일러플레이트가 상당하다.
방법 2: Abstract Class로 대체
// interface 대신 abstract class
export abstract class IContentItemRepository {
  abstract findById(id: EntityId, tx?: TransactionContext): Promise<ContentItem | null>;
  abstract findByLevel(levelId: EntityId, tx?: TransactionContext): Promise<ContentItem[]>;
  // ...
}

// 구현체
@Injectable()
export class ContentItemRepository extends IContentItemRepository {
  // ...
}장점: @Inject() 없이도 DI가 동작한다. abstract class는 런타임에 남으니까.
단점: Prisma 모델과의 호환 이슈. BaseRepository<T>를 abstract class로 바꾸면 제네릭 상속이 복잡해진다. 그리고 “인터페이스인데 class”라는 의미적 혼란.
방법 3: 구현체 직접 주입
// 인터페이스 import 대신 구현체 import
import { ContentItemRepository } from '../content/content-item.repository';
import { LevelRepository } from '../level/level.repository';

@Injectable()
export class BlockGenerationService {
  constructor(
    private readonly contentItemRepository: ContentItemRepository,
    private readonly levelRepository: LevelRepository,
  ) {}
}장점: 보일러플레이트 제로. NestJS 기본 DI가 그대로 동작한다. 단점: Domain Service가 구현체를 직접 알게 된다. DIP 위반이라고 할 수 있다.
우리의 선택
방법 3을 택했다. 이유는 단순하다.
1인 개발이었다. Repository 구현체가 바뀔 일이 현실적으로 없었다. Prisma를 TypeORM으로 교체할 계획도 없고, 테스트에서는 jest.mock()으로 충분했다. 방법 1의 토큰 관리 비용이나 방법 2의 abstract class 복잡도가 정당화되지 않았다.
⚠️ 주의: “나중에 ORM 바꿀 수도 있잖아”라는 가정은 YAGNI(You Aren’t Gonna Need It) 원칙에 정면으로 위배된다. 실제로 ORM을 교체하게 되면 Repository 구현체뿐 아니라 스키마, 마이그레이션, 쿼리 최적화 전부 다시 해야 한다. DI 토큰 하나가 구해주는 범위가 아니다.
✅ 적용 — 커밋 #20의 전체 변경
실제 커밋을 보자. BlockGenerationService의 변경이 핵심이다.
Domain Service 수정
// ❌ Before — interface import (type-only)
import type { IContentItemRepository } from '../content/content-item.repository.interface';
import type { ILevelRepository } from '../level/level.repository.interface';

@Injectable()
export class BlockGenerationService {
  constructor(
    private readonly contentItemRepository: IContentItemRepository,
    private readonly levelRepository: ILevelRepository,
  ) {}
}
// ✅ After — concrete class import
import { ContentItemRepository } from '../content/content-item.repository';
import { LevelRepository } from '../level/level.repository';
@Injectable()
export class BlockGenerationService {
constructor(
private readonly contentItemRepository: ContentItemRepository,
private readonly levelRepository: LevelRepository,
) {}
}import type이 일반 import로 바뀌었다. 이것만으로 NestJS가 생성자 파라미터 타입을 인식할 수 있게 된다.
같은 패턴으로 LevelAdjustmentDecisionService도 수정했다.
// ❌ Before
import type { ILevelRepository } from '../level/level.repository.interface';

export class LevelAdjustmentDecisionService {
  constructor(private readonly levelRepository: ILevelRepository) {}
}
// ✅ After
import { LevelRepository } from '../level/level.repository';
export class LevelAdjustmentDecisionService {
constructor(private readonly levelRepository: LevelRepository) {}
}📌 핵심:
import type은 TypeScript 3.8에서 도입된 명시적 타입 전용 import다. 컴파일 시 확실히 제거된다. 일반import도 interface면 제거되지만,import type은 “이건 런타임에 필요 없다”고 선언하는 것이다. NestJS DI와 함께 쓸 때는 절대import type을 쓰면 안 된다.
🧩 모듈 수정 — 의존성을 명시적으로 등록하라
Domain Service만 고치면 끝날 줄 알았는데, 아니었다. 모듈에서 의존성 그래프를 명시적으로 등록해야 했다.
문제: BlockGenerationService의 숨은 의존성
BlockGenerationService는 ContentItemRepository와 LevelRepository에 의존한다. 그런데 이 두 Repository는 AssignmentModule의 providers에 등록되어 있지 않았다.
// ❌ Before — AssignmentModule
@Module({
  providers: [AssignmentRepository, BlockGenerationService],
  exports: [AssignmentRepository, BlockGenerationService],
})
export class AssignmentModule {}BlockGenerationService가 providers에 있으니 NestJS가 인스턴스를 만들려고 한다. 그런데 생성자에 ContentItemRepository와 LevelRepository가 필요한데, 이 모듈에서 제공하고 있지 않다. 결과: DI 에러.
// ✅ After — AssignmentModule
@Module({
  providers: [
    AssignmentRepository,
    BlockGenerationService,
    ContentItemRepository,  // BlockGenerationService가 필요로 함
    LevelRepository,        // BlockGenerationService가 필요로 함
  ],
  exports: [AssignmentRepository, BlockGenerationService],
})
export class AssignmentModule {}
같은 이유로 LevelAdjustmentModule에도 LevelRepository를 추가했다.
// ❌ Before
@Module({
  providers: [LevelAdjustmentDecisionService],
  exports: [LevelAdjustmentDecisionService],
})
export class LevelAdjustmentModule {}
// ✅ After
@Module({
providers: [LevelAdjustmentDecisionService, LevelRepository],
exports: [LevelAdjustmentDecisionService],
})
export class LevelAdjustmentModule {}⚠️ 주의: NestJS에서 가장 빈번한 DI 에러가 바로 이거다. 서비스 A가 서비스 B에 의존하는데, B를 A가 속한 모듈의 providers에 등록하지 않은 것. 컴파일은 통과하지만 런타임에 터진다.
pnpm build성공 ≠ 서버 정상 동작이다.
PrismaService 경로 정리
이 커밋에서 하나 더 정리한 게 있다. PrismaService의 위치를 src/prisma.service.ts에서 src/database/prisma.service.ts로 옮겼다.
// ❌ Before — 5개 Repository 모두 이 경로
import { PrismaService } from '../../prisma.service';

// ✅ After — database 폴더로 이동
import { PrismaService } from '../../database/prisma.service';
v1에서는 PrismaService가 src/ 루트에 덩그러니 있었다. 3계층 구조를 만들면서 인프라 관련 파일은 database/ 폴더로 모으는 게 자연스러웠다. Repository 구현체가 database/prisma.service를 import하면 “이건 인프라 계층 코드”라는 의도가 경로에서 드러난다.
EventModule 수정
작은 수정이지만 언급할 가치가 있다.
// ❌ Before — EventEmitter2 인스턴스를 직접 export
@Module({
  imports: [EventEmitterModule.forRoot({ ... })],
  exports: [EventEmitter2],
})
export class EventModule {}
// ✅ After — EventEmitterModule 전체를 export
@Module({
imports: [EventEmitterModule.forRoot({ ... })],
exports: [EventEmitterModule],
})
export class EventModule {}EventEmitter2를 직접 export하면, 이걸 import하는 모듈에서 EventEmitter2만 주입받을 수 있다. 하지만 EventEmitterModule을 export하면, 그 모듈이 제공하는 모든 provider를 다른 모듈에서 쓸 수 있게 된다. 나중에 이벤트 관련 유틸리티를 추가할 때 EventModule만 import하면 전부 따라오는 구조.
🤝 인터페이스 파일은 남겨둔다
한 가지 중요한 결정이 있었다. 인터페이스 파일(.interface.ts)은 삭제하지 않았다.
Domain Service의 constructor에서 구현체를 직접 참조하게 됐지만, IAssignmentRepository, ILevelRepository 같은 인터페이스 파일은 그대로 두었다. 이유는 두 가지다.
첫째, 계약(Contract) 문서로서의 가치. “이 Repository는 어떤 메서드를 제공해야 하는가?”를 인터페이스 파일이 가장 명확하게 보여준다. 구현체를 열면 Prisma 쿼리 디테일에 파묻히지만, 인터페이스를 열면 도메인이 요구하는 기능 목록만 한눈에 보인다.
// domain/assignment/assignment.repository.interface.ts — 계약서
export interface IAssignmentRepository extends BaseRepository<Assignment> {
  findById(id: EntityId, tx?: TransactionContext): Promise<Assignment | null>;
  findByStudentId(studentId: EntityId, options?: { status?: AssignmentStatus }, tx?: TransactionContext): Promise<Assignment[]>;
  findActiveByStudent(studentId: EntityId, tx?: TransactionContext): Promise<Assignment | null>;
  findCompletedByDateRange(studentId: EntityId, startDate: Date, endDate: Date, tx?: TransactionContext): Promise<Assignment[]>;
  // ...
}
둘째, 테스트 Mock 타입. 단위 테스트에서 Repository를 Mock할 때, 인터페이스 타입으로 Mock 객체를 정의하면 타입 안전성을 보장할 수 있다. jest.mock()만으로는 메서드 시그니처 불일치를 잡지 못하지만, 인터페이스 기반 Mock은 컴파일 타임에 잡아준다.
💡 인사이트: 이 결정으로 “런타임 DI는 구현체, 설계 문서는 인터페이스”라는 이원 구조가 만들어졌다. 이상적이지는 않지만, 현실적으로 가장 적은 비용으로 가장 많은 가치를 얻는 타협점이었다.
📊 커밋 #20 임팩트
12개 파일, 101줄 추가, 19줄 삭제. DDD 3계층 구축(커밋 #15~#19)이 8,810줄이었던 것에 비하면 아주 작은 변경이다. 하지만 이 커밋이 없었다면 서버가 부팅조차 되지 않았다.
변경 파일 요약
| 파일 | 변경 내용 |
|---|---|
block-generation.service.ts | IContentItemRepository → ContentItemRepository |
level-adjustment-decision.service.ts | ILevelRepository → LevelRepository |
5개 Repository .ts | PrismaService import 경로 변경 (database/) |
assignment.module.ts | ContentItemRepository, LevelRepository providers 추가 |
level-adjustment.module.ts | LevelRepository provider 추가 |
event.module.ts | EventEmitter2 → EventEmitterModule export |
이 경험에서 배운 것
이 커밋 이후, 모든 새 Domain Service를 작성할 때 두 가지 규칙이 생겼다.
- Domain Service의 constructor에는 구현체 클래스를 쓴다. 인터페이스는
implements키워드에서만 사용. - 모듈에 provider를 추가할 때는 해당 서비스의 모든 의존성을 함께 등록한다. 빠뜨리면 런타임에 터진다.
그리고 하나 더. 이후 BE 작업 완료 보고 전 체크리스트에 서버 기동 테스트가 추가됐다.
pnpm build                    # TypeScript 빌드
PORT=3001 pnpm start:dev      # 서버 기동 테스트 (DI 검증)
# → "Nest application successfully started" 확인
pnpm build 통과 ≠ 서버 정상 동작. DI 에러는 컴파일러가 못 잡고, 런타임에만 드러난다. 이걸 잊으면 나중에 머지 후에 프로덕션에서 터진다.
📋 정리 — 핵심 요약
| 방법 | 코드 | 장점 | 단점 | 적합한 상황 |
|---|---|---|---|---|
| Custom Provider | @Inject('TOKEN') + useClass | 완벽한 DIP, 구현체 교체 1줄 | 토큰 관리, 보일러플레이트 | 대규모 팀, 멀티 구현체 |
| Abstract Class | abstract class를 DI 토큰으로 | @Inject 불필요 | 제네릭 상속 복잡 | 중규모, ORM 교체 가능성 |
| 구현체 직접 주입 | class import | 보일러플레이트 제로 | DIP 위반 | 1인 개발, 단일 구현체 |
| 안티패턴 | 권장 패턴 |
|---|---|
❌ import type { IRepo } 후 constructor에 사용 | ✅ import { Repo } concrete class 사용 |
| ❌ 모듈에 서비스만 등록, 의존 Repository 누락 | ✅ 서비스의 모든 의존성을 providers에 등록 |
❌ pnpm build 성공만 확인 | ✅ pnpm start:dev로 실제 서버 기동까지 확인 |
| ❌ 인터페이스 파일 삭제 | ✅ 인터페이스는 계약 문서 + Mock 타입으로 유지 |
다음 편에서는 이 구조 위에 단위 테스트 인프라를 구축한다. Jest 설정을 단위/통합으로 분리하고, Mock Repository로 Domain Service를 테스트하는 과정. 인터페이스를 남겨둔 게 빛을 발하는 순간이다.
📚 NestJS + Refine 풀스택 트러블슈팅 시리즈 (63편)
- 1. 왜 NestJS + Prisma를 선택했나 — B2B SaaS 백엔드 기술 선택기
- 2. 도메인 모델링 첫날 — B2B SaaS의 핵심 엔티티 정의하기
- 3. 27개 테이블의 탄생 — Prisma 스키마 설계기
- 4. 권한 매트릭스 — Admin/운영자/사용자 3역할 설계
- 5. BigInt PK에서 Int PK로 — 첫 번째 스키마 리팩토링
- 6. Seed 데이터의 함정 — FK 삭제 순서 삽질기
- 7. DDD를 도입하기로 했다 — Repository/Domain/Application 3계층
- 8. 인터페이스 구현체로 바꾸는 날 — NestJS DI와 TypeScript의 간극
- 9. 단위 테스트 인프라 구축 — Jest 설정부터 Mock까지
- 10. E2E 테스트와 Cloud SQL의 고난 — 4/8 passing에서 8/8까지
- 11. REST API 첫 구현 — 6개 Controller, 21개 엔드포인트 완성
- 12. v1.0 완성, 그리고 갈아엎기로 결심한 날
- 13. 번들 구조를 통째로 바꿔야 했던 이유
- 14. Phase 1 문서 정비 — Use Case를 번들 기반으로 다시 쓰다
- 15. Phase 2 스키마 마이그레이션 — 데이터 안 날리고 구조 바꾸기
- 16. Phase 3-1·3-2 — Repository와 Domain 서비스로 36개 빌드 에러 잡기
- 17. Phase 3-3·3-4·3-5 — Application부터 Module까지, v2.0 마이그레이션 닫는 날
- 18. 코드를 박은 다음 날 — 4,658줄 DDD 문서를 24분 사이에 다시 쓴 하루
- 19. v2.1 Domain Layer — 도메인 서비스 1,682줄을 한 커밋에 박은 날의 설계 철학
- 20. v3.0 Application Layer 재작성 — 도메인 서비스 위에 얇은 막을 한 Phase에 박은 날
- 21. 갈아엎고 80일 — v2.0 마이그레이션 8편 메타 회고
- 22. 1인 다역으로 5일 만에 90% — Admin Portal MVP를 끌어올린 토글 한 줄
- 23. Mock에선 되던 게 REST에선 안 됐다 — 응답 포맷 한 칸 차이가 만든 하루
- 24. CORS는 됐다 — PATCH만 빼고. allowedHeaders 한 줄과 Vite 프록시의 소문자 메서드
- 25. 멀티테넌트 누수 — tenantId 3계층 강제
- 26. Prisma 정책 싱글톤 — zod superRefine 임계값 가드
- 27. 멀티테넌트 쓰기 가드 — body.tenantId 차단과 집계 일관성
- 28. 두 번째 점검은 합류 지점이었다 — Admin Portal 2차에서 한 사이클에 잡힌 FE-BE 연동 버그 11건
- 29. Prisma 그래프 스키마 — 선형 레벨을 DAG로 옮긴 4가지 결정
- 30. 교육과정 구조 리팩토링 — 3필드 분리와 폴백 결정기
- 31. 배치고사 MVP — 자동 레벨 배치를 걷어내고 5지표 측정만 남기다
- 32. JWT Guard 적용 — request.user undefined부터 jwt malformed까지
- 33. 디버깅용 운영 API 7개 — Unity 만료 테스트 30분 대기를 0초로
- 34. NestJS Swagger 일괄 적용 — 35개 컨트롤러 + DTO 22개
- 35. Unity ↔ 웹 PostMessage 브릿지 설계기
- 36. Vuplex 브릿지 초기화 타이밍 — 첫 메시지가 증발한 이유
- 37. 콘텐츠 브릿지 10종 통합 완료 — 같은 규격으로 묶기
- 38. 지표 누계 시스템 — TOP5 순위를 INSERT 전용 스냅샷으로 굳히기
- 39. 킥오프 배치 첫 구현 — 매시 전체 EXPIRED 사고와 Winston 도입
- 40. 혼자 여러 역할로 QA 1차 — 브랜치 미동기화와 잔존 토큰의 함정
- 41. 타이머가 NaN:NaN으로 떴다 — Bundle API 응답 누락 필드와 비어 있는 콘텐츠 후보
- 42. 1인 개발 QA 5라운드 — 타이머·시드·스키마로 옮긴 버그들
- 43. Unity Lobby + 배치고사 씬 통합 — 두 클라이언트가 같은 회원을 보는 첫 빌드
- 44. 배치고사 MVP 후속 — 명세를 코드로 옮기고 레거시 571줄을 일괄 삭제하다
- 45. Problem 종속 끊기 — 1,891개 마이그레이션과 단위 테스트 38건
- 46. NestJS 권한 가드 — 목록은 막고 상세는 뚫린 날
- 47. 콘텐츠 후보 선택 3차 최적화 — 단일 쿼리로 옮기기
- 48. 재화 시스템 첫 머지 — 코인 지갑과 거래 원장(Wallet API)
- 49. 회원 레포트 5탭 API 설계 — 인사이트 3파트 구조
- 50. 보호자 외부 뷰어 대시보드 — 모바일 앱·초대 토큰 회원가입
- 51. 외부 뷰어 리포트 v1→v2 토큰 전환 — 가장 길었던 하루
- 52. 외부 뷰어 리포트 인사이트 — 활동 데이터를 자연어로 바꾸기
- 53. Framer Motion whileInView — 일부 카드만 안 뜨던 날
- 54. 외부 뷰어 리포트 4탭 N+1 — 14초 응답을 2초로
- 55. Cloud SQL 리전 트랩 — US→Taiwan 71% 트러블슈팅
- 56. QR 배치고사 + Firebase Hosting 멀티 사이트 배포
- 57. 1,974줄 풀 백업 — 1인 개발에서 상태 관리하는 법
- 58. 주간 출석 KST 타임존 — 월요일이 사라진 트러블슈팅
- 59. 연락처 포맷 통일 — 저장은 숫자만, 표시는 하이픈
- 60. react-hook-form + Zod 폼 표준 정착기
- 61. Soft Delete 구현 — deletedAt 한 컬럼이 닿은 27곳의 설계
- 62. 교육과정 자동 승급의 늪 — 도메인 버그 3 건 트러블슈팅
- 63. 교육과정 도메인 BE 완성과 같은 날 핫픽스 7 건 — NestJS @Cron 2 중 실행 묶음